All About Schemes
posted on
Schemes are one of the most interesting new things in Xcode 4, but also one of the hardest to get your head around at first. This guide will help you understand what schemes are and why they are useful.
What did we have?
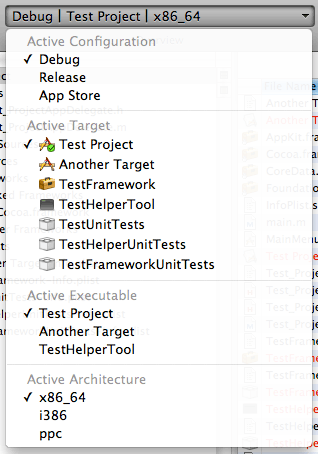
Xcode 3.2 had an overview pop up, which let you set the various settings involved in building and running your app. You could set the SDK to use, the build configuration, the target to build and which executable to run and also where and how you want to run the app. Unfortunately this led to many different combinations. In the image on the right alone there are 189 different possible combinations. Some projects could potentially get even more complicated.
There was even more complexity though. You could build, build an analyse, build and archive. You could run, or run with a performance tool. You had various debugging aids such as Guard Malloc that you had to remember to enable and disable depending on what you were doing, and various changing launch arguments and environment variables. Basically in order to manage everything you had to go to about 4 or 5 different places. And you would have to remember to change every setting for each different item (I have forgotten to change the active configuration to my App Store config when doing a build and archive many times).
What is a scheme?
Obviously this setup isn't ideal. You only have a few combinations of settings that you'd like to change. You almost always want to use a release build for archiving and profiling and a debug build for running, archiving and testing. Those are all distinct tasks, each with their own setup. You may also want different setups depending on what part of the app you're working on. For one particular part of the app you may want certain environment variables and tests to run. You may also want different arguments or environement variables set depending on whether you're running, testing or profiling.
Schemes essentially clump all these together, meaning you need to spend less time worrying about getting the right configurations. At its most basic a scheme is an environment in which to build, run, test, profile, analyse and archive your code.
Managing schemes
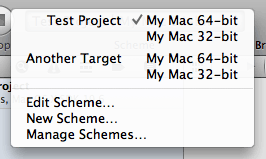
The most basic part of the scheme UI is the schemes menu. It is from here that you select the active scheme (on the left) and launch destination (on the right). For example, in the image on the left I have the Test Project scheme selected and it will launch on my Mac in 64 bit mode. On iOS the launch destinations should list the simulator and any development ready devices you have plugged in.
Below this you have a few options to edit the current scheme, create a new scheme and manage schemes. Editing schemes will be covered in the next section, but for now we're going to treat them as black boxes and see how we can manage them.
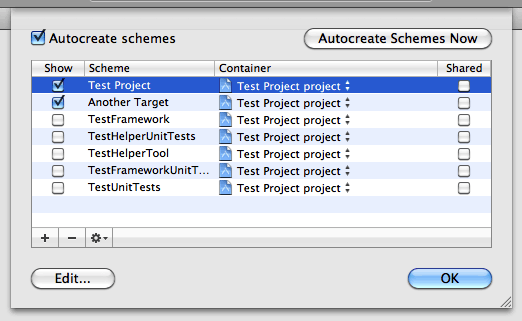
If you select the manage schemes option you will get a sheet pop up similar to the one below. By default Xcode automatically creates schemes for you based upon the targets in your project/workspace. Now you don't necessarily want or need all of those visible. In the example project the framework and helper tool will be built when we build the projects and the unit test bundles don't need to be built separately in Xcode 4, so we can hide all of those schemes (we could potentially just delete them as well).
Schemes can be contained either in a project or a workspace. The latter allows you to have schemes that only apply to certain groups of projects. It is also important to note that by default all schemes you create are personal to you, if someone else opens the project or workspace then they will not see your schemes (though Xcode will autocreate schemes for them). If you would like a scheme to be visible to everyone who opens a project of workspace then you can mark it as shared.
This setup is incredibly powerful, especially when working in groups. You can have shared schemes that cover things like final release build which need to be the same across all devs, but your own set of personal schemes for use during development which others may not need to see. And if you never need to used the shared schemes yourself can just hide them for you.
Finally, you can also export schemes and send them to someone else, who can then choose to import them, much like external build configuration files.
Editing schemes
Editing a scheme will bring up a different sheet. Along the top are controls similar to in the toolbar for selecting the scheme and destination to use and whether breakpoints are enabled. On the right are the main sections and on the left the details.
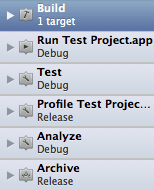
The UI for the various sections is somewhat confusing, and the icons don't do much to help initially I thought they were steps that followed on from one another, like target build phases. That isn't actually the case though and they represent two distinct steps. The first step is Build, the second step is either Run, Test, Profile, Analyse or Archive, depending on which action you selected. There are independent steps in most cases, so you can do a plain build, build and do a second step, or just perform one of the second steps without building (except analyse and archive which require a build). The UI could really be improved by making this separation between Build and other stages more distinct (rdar://9121706).
Build
The build panel has very few options. There are two basic options: Parallelise Build and Find Implicit Dependencies. The former will build independent targets at the same time and the latter will try to find any dependencies that are implicit in your project. What does that mean? Well say you have a framework that you build in another project and you have a copy of the built framework in your app's project to use for building. If you have a workspace with just your app's project in it works just as you'd expect. If you then add the project file for the framework to that workspace though, Xcode will build the framework from source for you. It's a bit like a cross project reference, but somewhat cleaner as you don't need the project there to build. In fact remove the framework project from the workspace and Xcode goes back to using the pre-built version.
Below is a table that contains the targets to build in this scheme, and when to build them. For example, you may only want your test bundles to build when testing and your frameworks to only rebuild when you do an archive or run. This is useful to help fine tune more complicated projects or workspaces.
You may also be wondering where the build configuration setup is. This isn't actually defined by the build stage, but by the second stage. For example, you usually want the debug configuration to be used for running, testing and analysing, but release for profiling and archiving. As such, you set the configuration in the other sections.

Run
The run panel lets you set up the environment in which to run your application. As well as the configuration, you can also choose which executable and debugger to use, letting you try out LLDB. You can also delay the launch, set a custom working directory and even set the UI scale factor (which gives me hope that we'll soon see resolution independance make a come back).
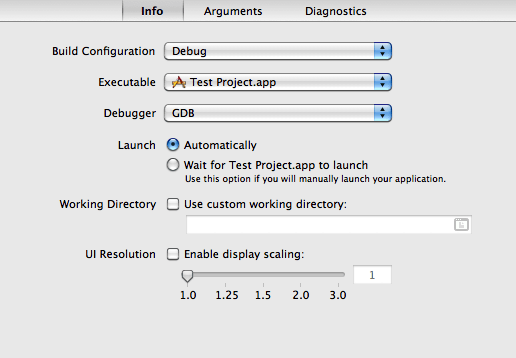
There are two other tabs as well. The first is arguments, where you can set the launch arguments, environment variables and which modules to load debug symbols for. The second is the diagnostics tab. This is where all the common debug tools can be found, such as guard malloc, exception logging and more.
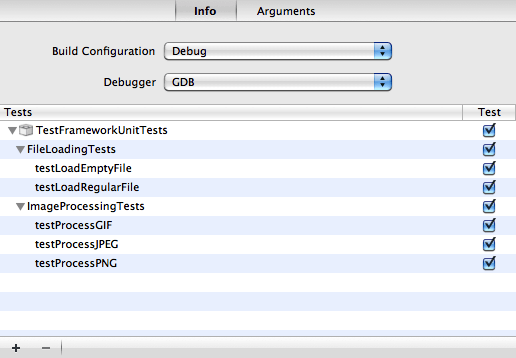
Test
The test panel is for setting up your test environment. This offers a huge improvement over Xcode 3.2. For starters, you can choose exactly which tests to run. Just uncheck a test to prevent it from running. This is great if you only want a subset of your test suite to run. The other big improvement is that you can debug tests and so can choose which debugger to use: GDB or LLDB.
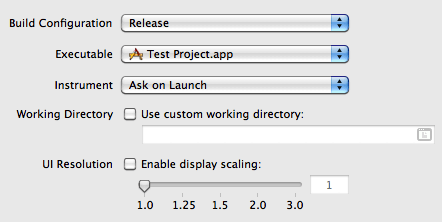
Profile
The profile panel is quite similar to the run panel, except instead of choosing which debugger to use, you choose which instrument template to use.
Analyse
You can't do much in Analyse bar change the build configuration.
Archive
Finally, archiving provides basic settings for how to archive your app. You can choose the name to use and whether to reveal the final archive in the organiser.
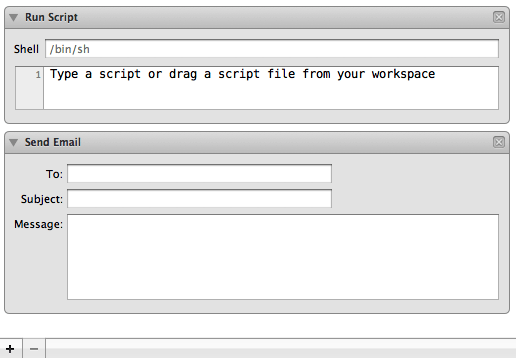
Actions
You may notice that each scheme stage has a disclosure triangle next to it. This is because you can set up actions to run before and after a stage. There are only two sorts of actions you can add: run script and send email. These can be useful for integrating with various build systems to let them know about the completion of a stage.
Schemes are rather simple and elegant once you get your head round them. They allow you to focus more on writing your code than constantly setting up your environment. The less you have to set up the fewer mistakes you will make. Hopefully this guide has been helpful to you understanding schemes, but let me know if you have any unanswered questions and I'll try to update it to answer them.